 In this edition of Cook Your Own (Bacon), I’ll save those of you making the transition from an older model Xbox 360 to a new one much of the expense, time, and hassle of transferring your hard drive data. Allow me to take a second and explain who may need to use the procedure and who does not. Read on if you’re unsure if this applies to you or you’d like to understand why this process is preferable, or go ahead and jump to the necessaries if you’re only interested in how to get this done.
If you have your replacement enclosure on hand, be sure to check out my addendum to this article.
1. Introduction
I’m no expert when it comes to Xbox 360 models, but to the best of my knowledge, there are 5 distinct versions: Pro, Arcade, Elite, S, and E. The S and E models are commonly referred to as the “slim” version of the console. E is the most recent of the two with a color and design scheme similar to that of the Xbox One. The first 3 “non-slim” models all had hard drives that attached to the top of the unit, and moving to a new 360 was as easy as popping the HDD case on. Models E and S utilize an internal set up where a port for the hard drive can be accessed by a panel on the bottom. Switching between the two is, again, as easy as pulling the drive out of one slot and reinserting it into another.
But what if you want to move one of the big clip-on HDDs to the inside of a newer, superior 360? Microsoft pretends like the feat is impossible but it’s quite simple. It involves almost zero interaction with the 360’s interface, no time-consuming data transfers, and it’s as easy as disassembling the casing around the old drive, getting down to nothing but the drive itself, and popping it into your new console. Why would you want to do this instead of some of the other options available?
The most advantageous aspect of directly switching the old HDD over is there’s no need to have 2 hard drives. All other methods center on moving the data from one drive to another but this isn’t always helpful. First of all, Xbox 360’s come in a multitude of retail packages with all kinds of extras if you’re willing to pay. For instance at this time Microsoft is selling 2 360 bundles for the same price. The first includes a 250GB hard drive plus an extra controller (I think). The second gives you the Kinect peripheral plus 2 Kinect-compatible games, but only a 4GB HD. Assuming you want to bring everything from your old console to the new one, each choice has a clear disadvantage.
If you choose the first bundle, you can use a transfer cable to connect the drives, a cable that’ll run $15 – $20 and that you’re unlikely to use again. You may also spend some serious time waiting for everything to move to its new home, but the good news is that the process will be relatively pain free not to mention idiot-proof. You won’t have to do anything more than plug your old hard drive directly into your new Xbox and click “yes” a few times.
If you don’t feel like buying a transfer cable, you can take a blank USB drive, stick it your 360 to have it formatted correctly, and move your data over in chunks. Cheaper, yes, especially if you’ve got a spare drive laying around (and even if you do have to buy one at least you can use it for other things), but depending on how much data you have it could be a real pain. In most cases you’ll have to make a few trips back and forth since everything won’t fit on one drive and you’ll have to wait for both the data to travel from the old HDD to the removable drive and again when it moves to the new HDD. It’d also help to have both consoles running as well unless you feel like hooking up and un-hooking each console each time to flash drive is filled.
Let’s say you go through one of these procedures; what are you really left with at the end? Not much. You’ve essentially thrown away the premium price you paid for the 250GB drive. All your new data is now on the new 360, but you’ve also got a perfectly functional and, now useless, HDD from the old unit. What you’ve done is spend more money on the same amount of memory you already had, albeit in a different form. The problem is that you don’t really need the 250GB that you’re paying for in the bundle. What you need is the same HD you had, only inside of the new 360. It’s not even like you’re gaining an extra 250 gigs of memory, you’re just paying for it to be in a different place.
Logically, where does this put us? The obvious solution is to move the HD we already have into the new console. This way we can either save some money by not purchasing the 250 gig hard drive, or put the money to better use, such as the Kinect bundle. But let’s first explore what happens if you bought the Kinect bundle outright and why you’d be interested in this project if you did.
For many people upgrading from an older 360 to a newer one, something like the Kinect bundle might seem optimal. You get a new console, Kinect peripheral, and 2 games to keep you occupied. The meager 4GB drive shouldn’t be a problem because you’ve got a nice meaty HD with your 360 gaming history already on it that you want to move anyway, right? Since we can’t pop the old HDD onto the new console, and since we probably have more than 4 gigs to move, what are our options (besides the project at hand)? There’s really only one. You’ll need to go out and buy a new internal 360 HD. Plenty of sizes are promised, but the dollar amount is substantial. The only one I ran across was a massive 320GB HD. If you need this much space it’s a good investment, but if you have plenty of space left over on your old hard drive, what’s the use in spending $129.99 on a new, 320GB internal drive on top of what you’ve already paid for your new Xbox 360?
If you do go with this new HD (or throw down the cash for any other internal HDs you’re able to find), you still have to do one of the processes I outlined above: use a transfer cable, or move it bit by bit with a flash drive. So, while the Kinect bundle may look more enticing to someone who isn’t interested in a new hard drive, it really boils down to the same crappy situation. You’ve now got to do exactly what you would do with the previous bundle only you’ll need to spend money on a new HD to do it.
Have I painted a clear enough picture yet? Even if manually disassembling these components wasn’t the simplest way to move data (and it is), it would still make the most sense from an economic standpoint. In either of the above scenarios the user is forced to pay for where the memory is rather than the memory itself. To use any of Microsoft’s “approved” methods of data transfer, you’re going to need to buy space that you don’t need just so that you can have it in a compatible form.
One thing you should note is that this process will not transfer the DRM licenses over to the new console. You’ll need to do this after you’ve moved your hard drive. If you don’t, any downloadable content will only be available to the user who downloaded it. Once you’ve moved licenses, anyone using your 360 can access your DLC as normal.
2. Project Overview
In case you’re ready to get down to business and have skipped the above section, here’s what we’re going to do. We’re going to disassemble the original HDD, get to the hard drive inside, and move it straight over to the new console. The drive under all the apparatus that helped it attach to older models is exactly the same type of drive used internally for the newer models. For anyone interested, it’s a very easy procedure and well worth the cost of the couple of tools you might need to purchase. Read the preceding section if you want to know exactly why this solution makes the most sense no matter what your situation is.
This project won’t give you any more space than you already had on your original drive, so if along with upgrading your 360 you plan on purchasing more memory as well, you will need to transfer the data to another HD. But if you’re happy with the free space on your existing drive and want to carry over your old data then this is definitely for you.
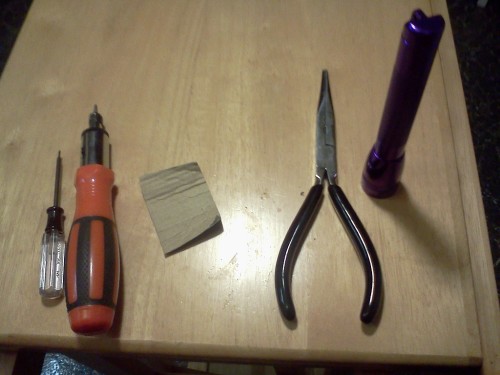
3. What You’ll Need
Besides the obvious components involved, the materials here are rather scant.
- Clip-on external HDD
- Xbox 360, models S or E
- Torx Wrench/Screwdriver, size T6
- Torx Wrenth/Screwdriver, size T10
- Replacement Shell or a small piece of cardboard
- Optional: Flashlight
- Optional: Needle nose pliers
That’s it! Pretty great huh? Some of you may not be familiar with Torx wrenches but they’re not hard to find. Although technically wrenches for whatever reason, these things look just like screwdrivers and can come in kits of individual tools or as a set of bits for the same tool. When you’re looking for these, the sizes will always be listed as “Tx” but instead of Torx, sometimes the term “Star” or “Star wrench/bit” will be used. It’s roughly hexagonal, except that instead of the tool using edges and corners like an Allen wrench, the sides terminate in 6 small points resembling a star.
Retailers like Wal-Mart and Target will have sets available at a low price though you really need to read through what’s included and make sure to find “Torx” or “Star” somewhere. In my experience these larger stores carry a decent selection of bigger sizes but not small ones. Many sets will have T10, T15,T20, and so on. This isn’t a problem since we’ll need the T10 (and you may actually want one of these kits with a billion bits in them for $10, comes in quite handy for weird shapes) although you’ll probably need to search elsewhere for anything below a T7.
Hardware and tool stores are the most obvious. I got a small set of 5 Torx wrenches ranging from T5 to T9 for under $15 at Sears. Whatever you get, make sure to have a T6 and T10 by the end of it all. It’s cheaper than any other alternative you’re going to find and these little guys can come in handy once in awhile. The reason I even had these on hand to begin with is because I’d long ago bought several different sizes in order that I could tension, adjust, and take apart pocket knives.
To truly install the drive properly you’ll need a replacement cage, available at Amazon. Click to here to take you to the page; they were under $7 at the time of writing this. If you want the cage but also want to get on with this project ASAP, go ahead and do everything using the cardboard, order the enclosure, and then use it once it arrives. The piece of cardboard doesn’t have to be big. I clipped off one of the little tabs of a small cardboard box and so far everything has worked fine. The purpose of all this is to keep the HD secure in its new home. Don’t put anything like plastic in there because the inside of the unit will gain a considerable amount of heat leading to a possible melt-down and subsequent damage to the new 360.
4. The Procedure
4.1. Step 1: Disassembling the Old HDD
With your old hard drive in hand, turn it over and find 4 screws on the bottom. Can’t? Only 3? Well, one of them is under the silver “Microsoft” sticker. The easiest way to get ride of this is to poke a small hole and unscrew from there. These 4 are circled in red on the picture and require the use of the T6.

Now that the 4 screws are out, the top of the casing should lift off. Start with the back end and then push towards the front a little to dislodge it completely. You are 100%finished with this top piece. Take a minute to remove the parts responsible for the clip-on action so that they aren’t falling everywhere from here on. Located at the front of what you have left, pick up the button, the black bar, and the tiny spring. You may want to save these if you ever plan on putting it back together, though I don’t see why you’d need or want to.
Next find 4 more screws. I’ve got them circled in the picture of what your HDD should now look like. Using the T10 remove them, and you’ll see that part of the metal cage is loose. You should be able to lift this piece directly off. Underneath is the actual hard drive and it’s almost totally disconnected except for the electronic hook up.

You’ll see a black bar connected to wires at one end and the hard drive on the other. The best, most gentle way to separate them is to hold the unit in your hands, place one thumb on the connector and the other near the top of the hard drive, preferably in the black area. Pull with both thumbs and it should come close. The hard drive won’t exactly slide out of its cage but you’ll be able to bend back the plastic on what remains of the shell enough to wiggle it out.

Take a look at what’s left; this is all that really matters. You’ll notice it’s the exact same shape as the internal drives currently being sold in stores. The shell can be discarded at this point or used for any other purpose you wish.

4.2. Step 2: Reinserting the HD into New 360
This is the easy part. If you look at the bottom of your new 360 you’ll notice a removable panel near one of the rubber feet. Remove it, and you’ll see where the hard drive goes. Depending on what sort of new 360 you bought there may or may not be something already in there. If there is, gently pull it out and if you can’t get your fingers in there well enough to do so use the pliers with extreme caution. In general this method is useful for those who don’t want to purchase an unnecessary extra HD, so hopefully there’s nothing in this bay to beginwith.

If you’ve got your replacement cage on hand go ahead and insert the drive and then stick the whole thing down into the console. If you don’t have a cage, getting the HD in exactly the right spot can be a little tricky. Use your flashlight to help if needed. You want to make sure that the label on the hard drive is facing up, or rather towards the longer portion of the bay while the unlabeled side faces the narrower area. Holding the drive with the top nearly flush to the port’s ceiling, gently lower it. You’ll feel some resistance when it gets to the connectors and you should be able to tell if it’s fitting onto the connectors or not. Again, use the flashlight if you need to.
When you’re confident that all is lined up, begin exerting some gentle but steady pressure on the drive until it won’t go down any further. None of it should be hanging outside of the expansion bay. Before I figured out precisely how to lower the drive in I had several missed attempts where I had to use the pliers to retrieve it. It’s also difficult to get a good grip on it once it’s in there so I also used the pliers to remove it from the connectors. Be careful if you do this though; it is going to take a little bit of force and you don’t want to handle the HD too roughly. I recommend grabbing the black part with the pliers (staying away from the green) and using a gentle rocking motion as much as possible. Once it’s connected you shouldn’t really have any reason to take it out (unless you end up with the replacement part in the near future) but I did want to quickly touch on the process since it can be a little tough.
If you don’t have the replacement enclosure here’s where the cardboard comes in handy. Fold it a couple of times to make a roughly square or triangle shaped piece and insert it under the newly installed HD. You’ll notice how much extra space is left in the opening after connecting the old hard drive and while it’s not a major concern it is a good idea to stabilize the HD and keep it from wiggling around. By slipping he cardboard underneath the drive is much more constrained. Don’t force it though. It should fit snuggly but you shouldn’t have to stuff it in or do a lot of cramming. If it’s too big trim it down or refold it. The pressure of the folds ought to be enough to hold the unit in place.
Replace the panel on the new 360, plug in all your wires, and you’re ready to go!
5. Finishing Up
Rather than saying “everything from your old 360 is on your new one” the better summation would be “your old hard drive is now in your new 360.” From here you can turn on your 360 and everything will be in place. The console doesn’t know the difference. You won’t even get any weird prompts.
One final thing you will need to do however is transfer your digital licenses. Without them, any content you’ve downloaded can only be used under the profile that downloaded them. Click here and Microsoft will walk you through the process. Afterwards you can treat your new Xbox 360 just like your old one. Everything works the same, all of the same save data is there, your profiles will work just as before…no noticeable differences except the superior hardware in your new machine.
It’s unfortunate that Microsoft didn’t opt for the easy solution of allowing old HDDs to snap onto E and S 360’s but luckily this is a very easy operation to perform. It makes sense on a number of different levels by avoiding the purchase of unneeded additional memory and the time involved with large amounts of data transfer. For anyone looking into trading up for a better 360, this project is definitely worth the time, effort, and cost of tracking down a couple of weird screwdrivers and possibly a $6.00 part to keep the set up official. Low risk, high reward, and no previous experience required.
6. Links
- Hard Drive Disk Replacement Enclosure (from Amazon.com)
- Instructions for Transferring Licenses (at Xbox.com)
Written by The Cubist
1 comment